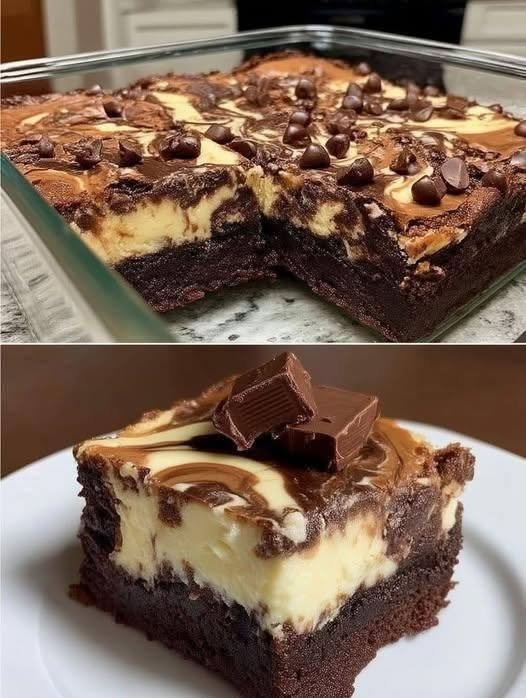
Gluten-Free Cheesecake Brownies
Makes: 16–20 brownies
Prep time: 20 minutes
Bake time: 40–50 minutes
Chill time: 1–2 hours
Total time: About 2½ hours
Ingredients
For the gluten-free brownie layer
- ½ cup (115 g) unsalted butter
- 1 cup (200 g) granulated sugar
- ½ cup (100 g) packed brown sugar
- 2 large eggs
- 2 teaspoons vanilla extract
- ¾ cup (75 g) unsweetened cocoa powder
- ¾ cup (90 g) gluten-free all-purpose flour
- ½ teaspoon baking powder
- ¼ teaspoon salt
- ½ cup (85 g) semi-sweet chocolate chips
- 2 tablespoons milk or heavy cream, if needed
For the cheesecake layer
- 8 oz (225 g) cream cheese, softened
- ⅓ cup (65 g) granulated sugar
- 1 large egg
- 1 teaspoon vanilla extract
- 2 tablespoons sour cream or Greek yogurt
- 1 tablespoon gluten-free all-purpose flour
Optional toppings
- ½ cup chocolate chips
- Chocolate shavings
- Fresh raspberries or strawberries
- Powdered sugar
- Chocolate sauce
Instructions
1. Prepare the pan
Preheat the oven to 350°F (175°C).
Line an 8 × 8-inch or 9 × 9-inch baking pan with parchment paper, leaving some overhang on the sides.
Lightly grease the parchment.
An 8 × 8-inch pan will give you thicker brownies, while a 9 × 9-inch pan produces slightly thinner brownies.
2. Make the brownie batter
Melt the butter in a saucepan over low heat or in the microwave.
Transfer the melted butter to a large bowl.
Whisk in the granulated sugar and brown sugar.
Add the eggs one at a time, whisking well after each addition.
Mix in the vanilla.
3. Add the dry ingredients
Sift the cocoa powder into the bowl.
Add the gluten-free flour, baking powder, and salt.
Fold everything together with a spatula until just combined.
Don’t overmix.
The batter should be thick and fudgy.
If it seems unusually dry, stir in 1–2 tablespoons of milk or heavy cream.
Fold in the chocolate chips.
4. Make the cheesecake filling
In a separate bowl, beat the softened cream cheese until smooth.
Add the sugar and beat until creamy.
Add the egg, vanilla, sour cream, and gluten-free flour.
Mix just until smooth.
Don’t overbeat the cheesecake mixture, as excessive air can cause it to puff up and crack while baking.
5. Create the layers
Reserve about ½ cup of the brownie batter for the top.
Spread the remaining brownie batter evenly into the prepared pan.
Pour the cheesecake mixture over the brownie layer.
Carefully spread it into an even layer.
Drop spoonfuls of the reserved brownie batter over the cheesecake layer.
Use the tip of a knife or a skewer to gently swirl the brownie batter through the cheesecake.
Don’t swirl too much—you want distinct cheesecake and brownie layers.
6. Add chocolate chips
If desired, sprinkle another ½ cup of chocolate chips over the top.
This gives you extra pockets of melted chocolate.
7. Bake
Bake for approximately 40–50 minutes.
The edges should be set, while the center should still have a slight jiggle.
Don’t wait for the center to become completely firm in the oven. It will continue to set as it cools.
If the top begins browning too quickly, loosely cover the pan with aluminum foil during the final 10–15 minutes.
8. Cool completely
Remove the brownies from the oven and let them cool in the pan for about 30–45 minutes.
Then refrigerate for at least 1 hour, preferably 2 hours.
Chilling is important because it allows the cheesecake layer to firm up and makes the brownies much easier to cut.
9. Slice
Use the parchment paper to lift the brownies from the pan.
For clean slices, use a sharp knife and wipe it clean between cuts.
For extra-clean bakery-style squares, chill the brownies overnight before cutting.
Tips for Fudgy Brownies
Don’t overbake. The center should still look slightly soft when you remove the brownies from the oven.
Use good cocoa powder. Dutch-process cocoa gives a particularly rich chocolate flavor, although regular unsweetened cocoa also works.
Use room-temperature cream cheese. It creates a smoother cheesecake layer with fewer lumps.
Don’t overmix. Once the flour is incorporated, stop mixing.
Chill before slicing. This is the secret to getting beautiful cheesecake layers instead of messy brownies.
Chocolate Cheesecake Swirl
For an extra chocolatey cheesecake layer, add:
- 2 tablespoons unsweetened cocoa powder
- 2 tablespoons melted chocolate
to the cheesecake mixture.
This creates a beautiful chocolate cheesecake layer between the brownie layers.
Raspberry Cheesecake Brownies
For a fruity variation, spoon ¼ cup raspberry or strawberry jam over the cheesecake layer.
Drag a knife through the jam and cheesecake before adding the brownie swirls.
The tart berries pair beautifully with the rich chocolate.
Storage
Because of the cheesecake layer, store the brownies in an airtight container in the refrigerator.
They will keep for approximately 4–5 days.
They can also be frozen for up to 2 months. Wrap individual brownies tightly in plastic wrap and place them in a freezer-safe container.
Thaw overnight in the refrigerator.
Important Gluten-Free Note
If these brownies are being made for someone with celiac disease or strict gluten intolerance, use ingredients specifically labeled certified gluten-free, including the flour, cocoa, chocolate chips, baking powder, and any toppings. Also avoid cross-contamination from utensils, pans, and work surfaces.
Best served chilled or slightly softened at room temperature with fresh berries and a drizzle of chocolate sauce. 🍫
